JavaScript Guides Advanced
Bonsai - a Loopless Tree Menu Using Event Delegation
 This is an example how to use Event Delegation instead of event handling to This is an example how to use Event Delegation instead of event handling to
avoid having to loop through a lot of elements.
A lot of JavaScript libraries pride themselves about their newly invented
collection aggregators, like getElementsByClassName,
getElementsByCSSSelector, getElementsByXPATH or whatever else there is.
These are undoubtly handy, especially when delivered in a less verbose syntax
(jQuery most likely being the king of shortening and concatenation).
I wanted however to show that you don't really need to get a lot of elements and
loop over them to achieve certain effects, when you just plan your script right
and use what modern browsers offer you to the full extend.
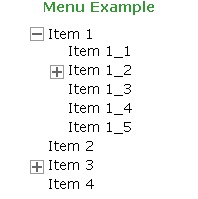
Without further ado, here is the script that turns a nested list into the menu on this
page:
1  YAHOO.util.Event.onAvailable('nav', function(){
2    this.className = 'dyn';
3    YAHOO.util.Event.addListener(this, 'click', toggle);
4    function toggle(e){
5      var t = YAHOO.util.Event.getTarget(e);
6      var n = t.parentNode.getElementsByTagName('ul');
7      if(n[0] && t.nodeName.toLowerCase() === 'a'){
8        n[0].style.display = n[0].style.display == 'block' ? 'none' : 'block';
9        t.parentNode.className = n[0].style.display == 'block' ? 'open' : 'parent';
10       YAHOO.util.Event.preventDefault(e);
11     }
12    }
13  })
These 13 lines of code use the Yahoo! User Interface library, but it could be as easily done without it.
- Line 1 fires off an anonymous function when the element with the ID nav becomes available.
- Line 2 applies a CSS class called dyn to the element, which effectively hides all the nested list items. You
define #nav.dyn ul{display:none;} in your CSS and let the browser's rendering engine do its magic instead
of hiding all the lists by hand.
- Line 3 applies an click handler to the whole menu element
- Line 4 is the start of the function invoked by the handler, the e parameter is the event object
- Line 5 retrieves the current event target - which is the element that was clicked on.
- Line 6 gets all the elements with the name ul inside this element.
- Line 7 tests if the first of these elements exists and if the name of the element that was clicked was an a. This
effectively checks if the activated link is one inside a list item that has a nested list and that the functionality
does not get triggered by clicking outside a link.
- Line 8 checks if the display setting of the nested list is block or none and toggles it
- Line 9 toggles the class name of the parent LI element accordingly
- Line 10 stops the link from being followed by calling the preventDefault() method of the event.
The HTML necessary is pretty straight forward:
<ul id="nav">
  <li><h3>Menu Example</h3></li>
  <li class="parent"><a href="#">Item 1</a>
    <ul>
      <li><a href="#">Item 1_1</a></li>
      <li class="parent"><a href="#">Item 1_2</a>
        <ul>
          <li><a href="#">Item 1_2_1</a></li>
          [ ... ]
        </ul>
      </li>
      <li><a href="#">Item 1_3</a></li>
      [ ... ]
    </ul>
  </li>
  <li><a href="#">Item 2</a></li>
  <li class="parent"><a href="#">Item 3</a>
    <ul>
      <li><a href="#">Item 2_1</a></li>
      [ ... ]
    </ul>
  </li>
  <li><a href="#">Item 4</a></li>
</ul>
The only downside is that you need to set classes on the parent elements to apply the necessary styling to turn them
into a tree. This could be done dynamically but would need a loop as sadly enough browsers these days don't have
a 'style all li items that have a ul item in them differently' selector in CSS.
You can use these classes however to also style "parent" links differently for the non-dynamic version:
#nav .parent{
  font-weight:bold;
}
#nav.dyn .parent{
  font-weight:normal;
  background:url(/closed.gif) 2px 4px no-repeat #fff;
}
#nav.dyn .open{
  background:url(open.gif) 2px 2px no-repeat #fff;
}
You can show the icon for collapsing and expanding by adding padding and undoing it with a negative margin on
the embedded links.
#nav.dyn li{
  padding-left:20px;
  min-height:19px;
}
#nav.dyn li a{
  display:block;
  margin-left:-20px;
  padding-left:20px;
  color:#000;
  text-decoration:none;
}
A working example of the menu is available at the author's website.
—
JavaScripts Guides: Beginner, Advanced
JavaScripts Tutorials: Beginner, Advanced
[Home] [Templates] [Blog] [Forum] [Directory] JavaScript Guides Advanced -
Bonsai - a Loopless Tree Menu Using Event Delegation
|